
How to Create a Keyhole Markup Language File (KML)
Access Google Earth
Google Earth is used to create a Keyhole Markup Language (KML) file to visualize and share geographic information about your project. Create your KML using either Google Earth Web (requires a Google account), or Google Earth Pro for desktop (requires download and installation). Both sets of instructions are included below.
Review these key points before beginning
- The KML should provide an accurate and detailed representation of the project's location, size, components and works; placemarks and/or pins alone are insufficient.
- Use multiple line and/or polygon features for different project components. To differentiate components, title each feature with a descriptive name.
- If the project includes multiple phases, identify each phase in the feature's title. If Housing, Infrastructure and Communities Canada (HICC) is only funding specific phases of the project, note that information in the feature's description.
- For most projects, all features should be submitted in a single KML file.
|
Geospatial Feature |
Examples of Project Components |
|---|---|
Line |
|
Polygon |
|
Instructions for Google Earth Web
Step 1: Create a new project
Click 'Launch Earth'. Click '+ New'. Choose whether to save as a 'Drive project' (to Google drive) or as a 'Local KML file' (stored on the browser or device). Click 'Create'. In the left-hand panel, hover over the file name, click the three dots, select rename and enter a title for your project. Avoid using special characters like \ / ( ) { } [ ] : * ? " <>| # % $ & !
Step 2: Navigate to the desired location
Navigate to the desired location on the map by typing an address in the search bar (top-left corner) and/or by dragging the map to the correct location. Zoom in and out using the minus and plus signs in the bottom-right corner.
Step 3: Create a KML to display project components
Add a Placemark: To optionally mark the project's central location, click the ‘Add placemark' icon ![]() or ‘Add' > ‘Placemark' in the menu. A placemark will appear on the map, and you can move it to the desired location or specify coordinates. In the right-hand panel, enter a title for the placemark and optional description.
or ‘Add' > ‘Placemark' in the menu. A placemark will appear on the map, and you can move it to the desired location or specify coordinates. In the right-hand panel, enter a title for the placemark and optional description.
Draw Lines (Paths) or Polygons: To draw a line or polygon, click ‘Add path or polygon' ![]() icon or ‘Add' > ‘Path or polygon' in the menu. Select a starting point and click on the map to add points that will delineate the path or polygon. For lines, click ‘Done'. For both lines and polygons, click ‘Save to project'. In the right-hand panel, enter the title of the component and an optional description. Click the paint bucket icon to adjust the colour.
icon or ‘Add' > ‘Path or polygon' in the menu. Select a starting point and click on the map to add points that will delineate the path or polygon. For lines, click ‘Done'. For both lines and polygons, click ‘Save to project'. In the right-hand panel, enter the title of the component and an optional description. Click the paint bucket icon to adjust the colour.

Step 4: Adjust the features
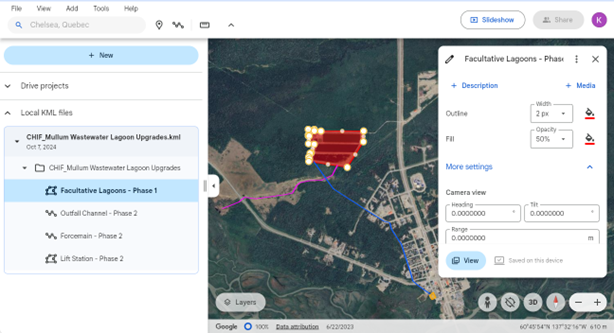
Click on any placemark, line, or polygon in the left-hand panel to adjust the feature. A right-hand panel will appear. Click 'Edit'. You can edit the title, description, and colour. You can also adjust the points on the map that make up the feature. Below is an example project:
Step 5: Save your KML file
To export your project as a KML file, click on the three dots next to your project title in the left-hand panel, then choose 'Export as KML file'. The KML file will appear in your Downloads folder. It can be shared or uploaded to other mapping platforms.
Instructions for Google Earth Desktop
Step 1: Create a project folder
Right-click on 'My Places' or 'Temporary Places' > 'Add' > 'Folder'. Name the folder using the project title and click 'OK'.
Step 2: Navigate to the desired location
Navigate to the desired location on the map by typing an address in the search bar or by clicking and dragging in the map viewer. Click 'View' > 'Reset' > 'Tilt and Compass'. Zoom in and out using the minus and plus signs in the top-right corner.
Step 3: Create a KML to display project components
Add a Placemark (Point): To optionally mark the project's central location, click 'Add Placemark' in the toolbar or 'Add' > 'Placemark' in the menu. Enter a name for the placemark and adjust its location on the map by dragging the yellow pin or by specifying known latitude and longitude coordinates. In the 'Properties' panel, enter a title for the placemark and optional description. Adjust the style and colour.
Draw Lines (Paths) or Polygons: To draw project components, use the 'Add Path' and/or 'Add Polygon' buttons or 'Add' > 'Path or polygon' in the menu. Click on the map to create points. Click and drag any point to adjust its location, click on the map to add a new point, or select a point and press the 'Delete' key to remove it. In the 'Properties' panel, enter a title for the project component and optional description. Adjust the style and colour. Click 'OK' when finished.
Step 4: Adjust the features
Right-click on any placemark, path, or polygon to open the 'Properties' window. Users can edit the label, description and colour, and check measurements. Users can also adjust the points on the map that make up the feature.
Step 5: Save your KML file
Right-click the project folder, then 'Save Place As'. Name your file. Avoid using special characters like \ / ( ) { } [ ] : * ? " <>| # % $ & ! Select the KML format and save to your computer. Your KML file can be can be shared or uploaded to other mapping platforms.
Page details
- Date modified: