
Expression of Interest Form – Zero Emission Transit Fund

Table of Contents
- Applicant Identification
- Planning Project Costs
- Project Planning
- Annex A - How to Create a .KML File
Step by Step Guide for Planning Projects application form
How to complete the Planning Projects application form (PDF)
Applicants are asked to respond to the following questions as part of the application process for a Planning project. This is a smart form and depending on your responses, the form may allow you or block you from responding to subsequent questions. A red highlighted box indicates that a response is required.
Applicant Identification
Lead Applicant
- Legal Name: Using the text box, provide the applicant organization’s legal name as shown on the certificate of incorporation/registration. If you are applying on behalf on an eligible recipient, provide the legal name of the eligible organization.
- Organization Type: Select from the options provided.
Fleet Location
- Select the Province(s)/Territory(ies) where the current bus fleet is located and where the project will take place.
- Provide the name(s) of the local / regional government, service district, reserve or settlement where the current bus fleet is located.
- Provide a project location map that identifies the geographical boundaries of the current bus fleet’s network and anticipated project location. This project location map should be submitted to Housing, Infrastructure and Communities Canada as an attachment to your application and should be in the form of a .KML file.
- Create and upload a .KML file that identifies the geographical boundaries of the current bus fleet’s network and the anticipated project footprint (if known).
- The .KML file should delineate the project boundaries and indicate all areas where project activities are expected to take place (i.e. modification of an existing facility, installation of charging infrastructure etc.). Multiple .KML files can be provided with the planning application.
- The .KML file will be used for the Duty to Consult with Indigenous People and the Impact Assessment Act Requirements.
- Refer to Annex A for instructions on creating your KML file.
- Please save the .KML file(s) with the name of your project included in the title.
Project Title
Provide the project title
Provide the project title or name of your project. Note that if your project is approved, the project title indicated in your application will be used for the funding agreement and public reporting.
Expression of Interest (EOI) reference number
- Using the text box, indicate the reference number assigned to the project at the EOI stage.
Application date
Indicate the date of your planning application.
Select the relevant transportation sector from the options provided
- School Transportation
- Public Transit
Note: Each planning project application must follow one stream only, School Transportation or Public Transit. If you are applying for both, two separate applications must be submitted.
Provide an overview of your existing bus fleet including the number of buses, class of bus, remaining life expectancy, and propulsion technology.
- Provide an overview of your existing bus fleet including the number of buses, the class of bus, the remaining life expectancy and propulsion technology. Any additional information describing the existing bus fleet, or that is relevant to the project, should be provided as part of the planning project application.
- Provide an overview of the proposed planning project including the objective, a detailed scope of work and planned deliverables and milestones.
- Provide an overview of your proposed planning project, including information about the specific studies, analysis, and forecasting that will be undertaken to advance a zero emission bus deployment project.
- Supporting documents (e.g., Request for proposal) may be submitted as an email attachment with the planning application form.
Planning Project Costs
Planning Project Costs Summary
- Provide the total eligible project cost under the ZETF.
- The federal share of the project costs, or the maximum amount requested under ZETF is determined by the total eligible project costs and not by the total project costs.
- Provide the total eligible project cost for the planning project.
- Refer to Section 2 – Projects eligible for funding and Section 5 - Contribution Information of the Zero Emission Transit Fund Applicant Guide to assist with identifying which costs are eligible and ineligible under ZETF.
- Provide the requested federal funding amount for the planning project under ZETF.
- Provide the total ZETF contribution requested for the planning project.
- Refer to Section 2 – Projects eligible for funding of the Zero Emission Transit Fund Applicant Guide for detailed information concerning the maximum federal contribution (percentage of eligible project costs) under ZETF for planning projects.
- Provide the Applicant’s share of the planning project cost.
- Provide the amount (share of project costs) that will be covered by the Applicant.
- The “Applicant Share” of funding is the balance of funds you will be contributing to the project and would include any ineligible costs.
Federal Share Cash Flow
Provide a breakdown of costs for the project and funding that your organization will be claiming from the Zero Emission Fund by fiscal year (April 1 – March 31)
- Provide the requested federal amount of the project cost for each fiscal year of the project by completing the table in the form.
- Note that the amount requested for each fiscal year must not exceed the maximum contribution (%) of the costs incurred and paid by the Applicant for that given fiscal year. For example, Housing, Infrastructure and Communities Canada will not pay for costs incurred in the first year while the Applicant pays for costs incurred in the second year.
Indicate the contingency (%) included in the cost estimate of your planning project
Procurement Strategy
Will non-competitive procurement be required for the planning project?
- Select Yes or No
If Yes provide the information below for all non-competitive contracts:
- Name of Company/Consultant
- Amount of contract: Indicate the amount of the contract ($)
- Nature of work: Outline the nature of the work. What work will be done, when, and how?
- Rationale: Outline the rational for having this work completed through non-competitive procurement
*If you have more than four entries, please provide this information in an additional document that should be submitted to Housing, Infrastructure and Communities Canada as an attachment to your email application.
Planning Project Timelines
Provide the forecasted dates for the following planning project milestones including:
- The estimated date that you anticipate the procurement process to begin. This may be a fixed date or the targe date to launch the process. Provide any other relevant information concerning the timelines of planned procurement activities (if applicable).
- The expected start date for the planning project(s).
- An outline of the deliverables (i.e., planning study) you are expecting to receive from the planning project(s) (Receipt of project deliverable).
- The expected end date for the planning project(s).
Project Planning
This section will inform Housing, Infrastructure and Communities Canada on how your proposed planning study(ies) will strengthen and inform zero emission bus (ZEB) electrification.
System-Level Planning
- Describe in detail how the proposed study will strengthen the information base and support long-term, system-wide solutions, including how the study will inform on the following:
- System-wide analysis of ZEB technologies, technology selection and system-wide design
- Identifying barriers to system-wide electrification
- Identifying charging/fueling infrastructure needs and strategies
- Exploring energy requirements, supply, grid capacity and potential limitations
- Identifying facility requirements and utility modification requirements
Operational Planning and Deployment Strategy
- Describe in detail how the proposed study will support innovative and effective operations, and provide a strategy to measure performance, including how the study will inform on the following:
- Informing bus routing optionality
- Determining maintenance and operational needs
- Exploring ZEB fleet roll-out and procurement needs
- Developing a plan to collect and analyze data from deployment, identify best practices, and measure performance
Financial Planning
Describe in detail how the proposed study will measure the anticipated financial savings associated with the project compared to the baseline scenario, including how the study will inform on the following:
- Estimating the lifecycle costs savings associated with the transition to ZEB fleet, considering fuel and electricity consumption, maintenance and operations and all other lifecycle costs associated with the project
Describe how the study will involve the preparation of cost estimates for a ZEB deployment project.
Capacity to Implement the Technology
Describe in detail how the proposed study will identify internal capacity needs, and the resources required to implement and operate the technology, including how the study will inform the following:
- Technological, operational and system-wide risks associated with deployments and the development of a risk management plan
- Identifying organizational needs to implement a future deployment
- The development of a short- and long-term operational business plan
Environmental Benefits
Describe in detail how the proposed study will explore environmental benefits of the technology over a lifecycle and compared to the baseline scenario, including how the study will inform on the following:
- GHG emissions reductions
- Noise reduction estimates
- Non-GHG pollutant reductions (air quality)
- Climate risks and resiliency measures for the project
*Supporting documentation may be provided as part of the application. If so, name the file based on its corresponding heading, and attach the document to the planning form email submission.
Aboriginal Consultation, Accessibility and Environmental Assessment
Using the text boxes
- Describe how the planning project will identify if any potential capital project would be located on federal lands and/or on Indian Reserve lands.
- Describe how the planning project will consider potential requirements for engagement with Indigenous groups and, if required, how would these groups be identified?
- Describe how the planning project will explore ways fleet electrification could benefit vulnerable populations (including youth, seniors, Indigenous peoples, persons with disabilities and low-income populations) by providing accessible and safe access to clean transportation?
- Describe how will the planning project consider views and input from stakeholders including provinces or territories, local communities and utility providers?
Document Checklist
If applicable and at a minimum, confirm that you have attached the following documents:
- Project location map in KML format (mandatory for all projects)
- Project map or plan showing project elements in schematic form
- Additional information on the current status of bus fleet
- Additional information on the planning project details
- Additional information on addressing key barriers to bus electrification planning
- Additional information for costing
- Consultation records that involve provinces or territories, and Indigenous communities and affected communities in PDF format
- Council resolution (for local governments) or Board of directors letter, supporting the project
- Other (please identify and attach document)
*. Canada reserves the right to request additional documentation to supplement the application.
Attestation
Provide you name, position, and name of the organization of the individual attesting to the information being provided for the planning application submission.
Submitting the Application
Once the application is completed, submit the application by email to zetf-ftcze@infc.gc.ca. Follow the instructions below for submitting the email application.
- For the subject line of the email, please include the following: Stage II ZETF Planning Application - (provide the project name and applicant organization?)-(Date)
Example Subject line: Stage II ZETF Planning Application - ABC Project – Sept. 1, 2021 - For the body of the email, copy, paste, and complete the following template.
- Project Name:
- Expression of Interest (EOI) reference number:
- Location of the project:
- Estimated start date for the planning project:
- Estimated end date for the planning project:
- Estimated total cost of the project(s):
- Project Summary: Write a brief 1-2 paragraph summary about the project.
Annex A - How to Create a .KML File
We ask that all applicants provide their project location in one single format as a .KML file. This simple file type, designed specifically for the visualization of geographic data, is compatible with the work we need to perform and provides an accurate and detailed representation of the project location. Using a .KML allows a variety of point, polygon, and line data to be represented spatially with detail and consistency. A .KML file can be created easily by anyone using Crown-Indigenous Relations and Northern Affairs Canada (CIRNAC) publicly available Aboriginal & Treaty Rights Information System (ATRIS) web-based application or Google Earth’s free desktop application, as well as other geographic software packages like ArcGIS or QGIS. This guide will walk you through the steps to do so using ATRIS or Google Earth.
Using ATRIS
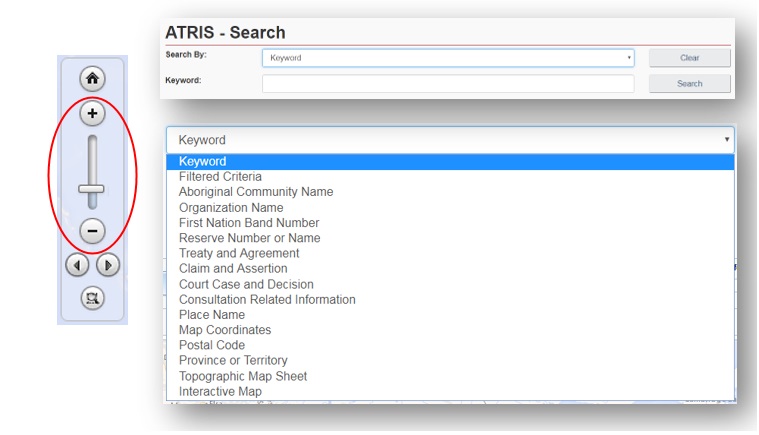
1. Navigate to INAC’s publicly available ATRIS web-based application.
2. Navigate to the project location in the map viewer, either by clicking, dragging, scrolling to zoom, or using the various search options available in the ‘Search By:’ drop down menu.
3. Draw your project on the map in the exact location using the “Draw on map” tools drop down located in the top right of the ATRIS interface. You may draw as many components of varying types (pointEndnote *, line, polygon) as necessary to be saved as one single .KML file.

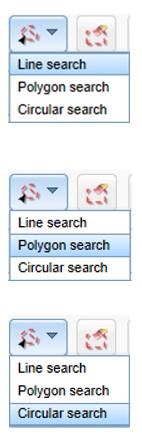
Choose the appropriate drawing tool for the type of component you are drawing:
- Line search
- Click as many times as necessary to create a line that represents your linear project feature. Double click to complete.
- Examples include: roads, sewer lines, railways, pipelines, trails, transmission lines, etc.
- Polygon search
- Click as many times as necessary to create a closed polygon that represents the project feature. Double click to complete.
- Examples include: building footprints, vegetation cuts, sewer/wastewater lagoons, etc.
- Circular search
- Click on the map to automatically create a circle. To create a smaller circle similar to a point, zoom in as close as possible on the map before clicking. Alternatively, click and drag, then release to draw a circular project feature yourself.
- Examples include: wells, outfalls, culverts, etc.
If at any time you wish to erase anything you’ve drawn, use the following two options:

Erase by Exent: Click and drag to create a shape around what you want to delete. Anything intersecting the box will be deleted when you release.
Global Erase: This will erase everything on the map. Click “OK” when prompted to clear the map viewer and start fresh.
4. Once you are satisfied with the drawn representation of your project, click the ‘Export’ button.

The .KML will download as ‘SearchAreas.kml’ (unless you have specified otherwise) to the location where your browser saves downloads.
The file name can be changed to something that reflects the project name before sending it to HICC.
Once saved, the .KML file is ready to be uploaded or sent via email.
Should you need any further assistance with ATRIS, please visit the following link to find more information about ATRIS training webinars.
Using Google Earth
* If you already have Google Earth installed on your system, skip to step 2.
- If you don’t already have Google Earth (free) installed on your system, follow the download instructions.
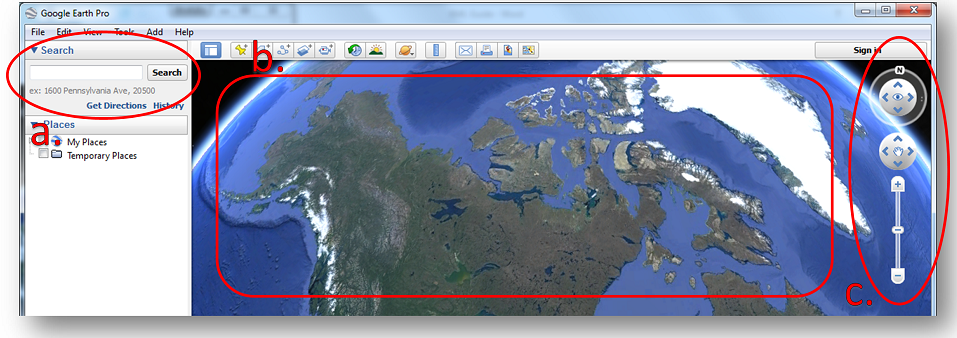
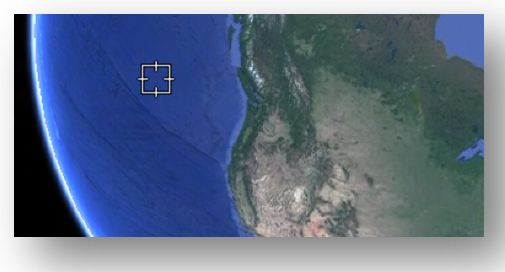
- Navigate to your project location using one or more of the following options:
- Typing an address or coordinates in the search bar
- Clicking, dragging, and scrolling in the map viewer
- Using the navigation tools
- Draw your project on the map in the proper location using the placemark, polygon, and path tools (pictured below). You may draw as many components of varying types (point, line, polygon) as necessary.

Choose the appropriate drawing tool for the type of component you are drawing:
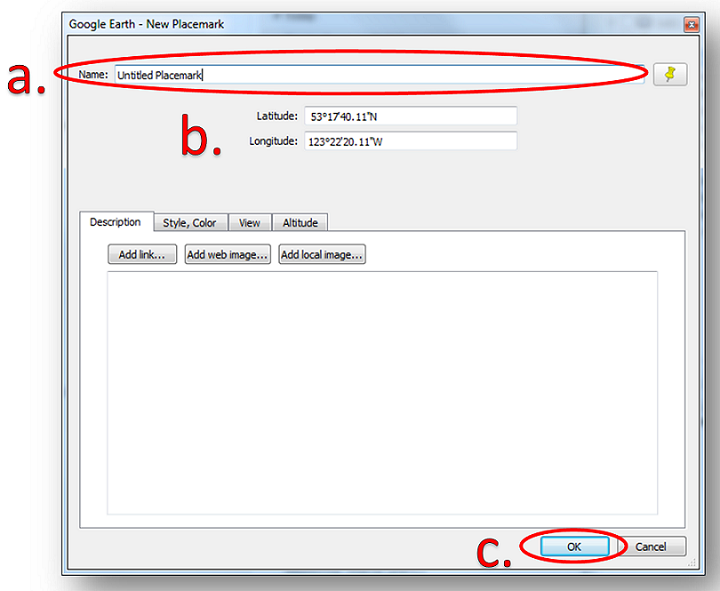
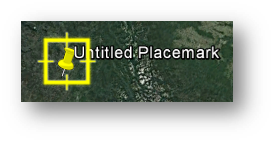
a. Placemark: point project components
- Examples include: wells, outfalls, culverts, etc.
 Clicking this button will add a placemark to the map and bring up a corresponding dialogue box (see below).
- You can move the placemark by clicking and dragging it to the desired location or entering the desired latitude and longitude coordinates in the dialogue box (a).
- You can rename the placemark by changing the entry in the ‘Name’ field of the dialogue box (b).
- Click ‘OK’ when finished (c).
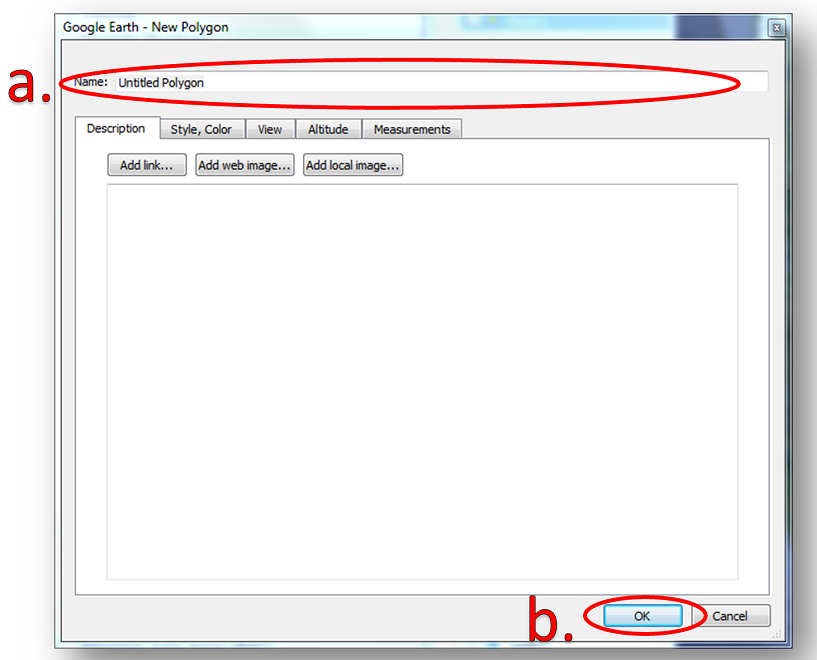
b. Polygon: project components that consist of an area of any shape
Examples include: building footprints, vegetation cuts, sewer/wastewater lagoons, etc.

Clicking this button will bring up a dialogue box and a crosshair cursor (see below)
Click as many times as necessary to create a closed polygon that represents your project feature.
You can rename the polygon by changing the entry in the ‘Name’ field of the dialogue box (a).
Click ‘OK’ when finished (b).

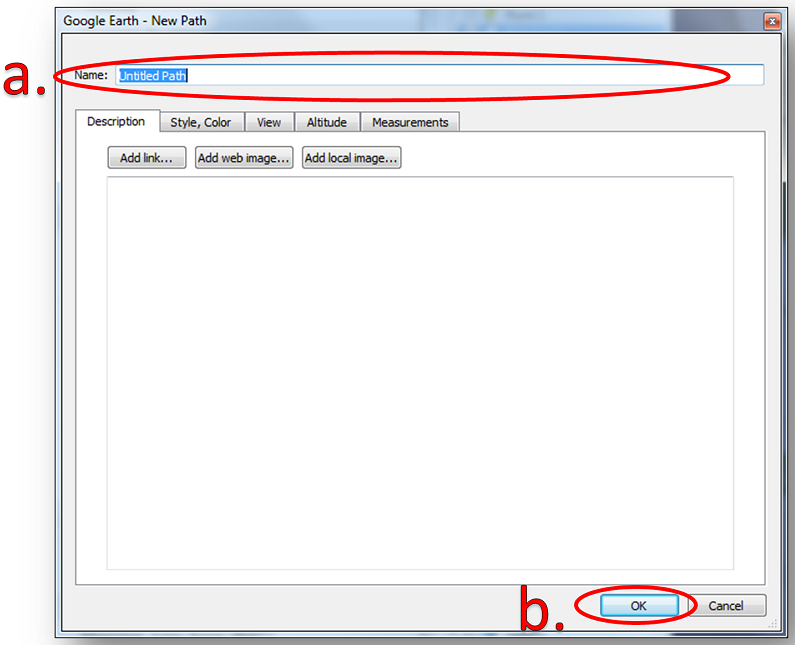
c. Path: linear project components
- Examples include: roads, sewer lines, railways, pipelines, trails, transmission lines, etc.
-

Clicking this button will bring up a dialogue box and a crosshair cursor (see below). Click as many times as necessary to create a line that represents your project feature.
-
- You can rename the path by changing the entry in the ‘Name’ field of the dialogue box (a).
- Click ‘OK’ when finished (b).
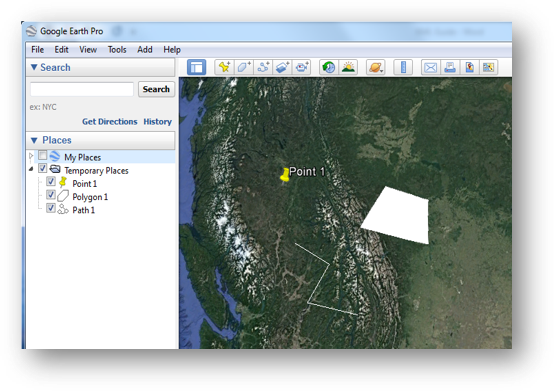
All drawn components will appear in the ‘Places’ sidebar under the ‘Temporary Places’ folder.
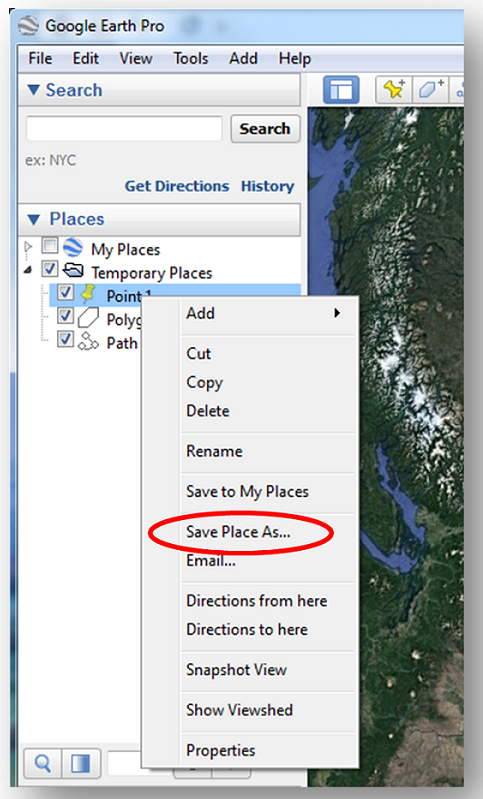
4. Export the shapes to .KML to be shared.
Warning: If you have multiple shapes, they will need to be exported individually as separate .KML files.
- Right click on the component in the ‘Places’ sidebar and click ‘Save Place As…’.
- Change the file type from .KMZ to .KML using the ‘Save as type:’ drop down menu.
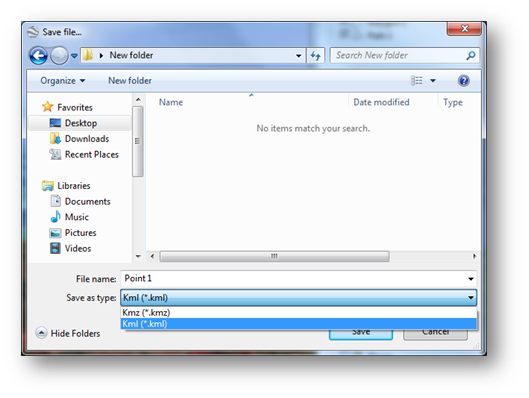
- Choose the location where you would like to save the file in the file browser. You will need to locate it later on to send it to HICC.

Click ‘Save’ when you are finished. You are now ready to upload or email the file to HICC.
Repeat Step 4 for as many project components as you have created if you have more than one.
Page details
- Date modified: